Instruction Manual

Procedure for preparing a wet cryostat or cryofurnace
To simplify the operations, the cold valve will stay open during the whole procedure.
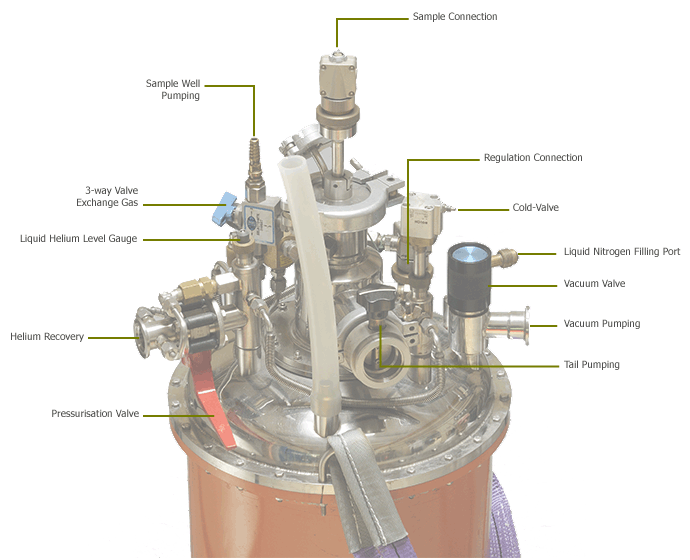
Before starting to cool the cryostat, pump the isolation vacuum via the vacuum valve to better than 10-5 using a turbo-pump. Be sure to use a flexible line that has NEVER been used for pumping helium.
- Connect the temperature controller to the regulation socket. Verify that the thermometers indicate the ambient temperature and test that the heating and regulation are operational by heating for example to 310 K. Check that the calibration curve selected in the LakeShore corresponds to the one of the cryostat by visiting the web page of the cryostat.
- With all valves closed, connect the cryostat to the pumping rack : “Helium recovery” valve to the output marked “bath” and tail pumping line to “tail”.
- Connect the liquid He level gauge and check the calibration.
- Flush out the cryostat using pure helium gas from the liquid helium dewar:
- Connect the siphon port of the cryostat to the gas outlet of the dewar while keeping the valve of the dewar closed.
- Open the helium bath and the tail pumping valves on the cryostat.
- Start the pumping rack and pump:
- the He bath (bath)
- the tail (tail)
- the sample chamber by turning down the three-way blue valve.
- Close the valves on the pumping unit and wait for 5 minutes. Check that there is no pressure increase shown on the gauge of the pumping unit. If the pressure rises, there is a leak in the system. Verify all connections and in particular the “o” ring joints of the Wilson seals (3).
- Open the dewar valve to fill the bath with gas. Verify that the tail pressure rises. When the pressure is equal to the atmospheric pressure, close the dewar valve. Repeat the operations c) to e) two times.
- Switch off the pumping rack, open the He recovery valve of the rack and close the tail pumping valve and the 3-way blue valve of the cryostat. Open the helium dewar valve.
- Connect the liquid nitrogen dewar to the filling port and fill the nitrogen bath. Check the calibration of the level monitor.
- 10 minutes after filling the liquid nitrogen, you may start transferring He:
- Introduce the siphon slowly into the helium dewar,
- Purge the siphon with helium gas before introducing it into the cryostat,
- Control the transfer flow by pressurising the helium dewar via the gas outlet valve (using a pressurising bladder). Start with 40 to 60 mbar pressure until the helium level starts to rise . You can then increase the pressure up to 100 - 150 mbar. Normally 12 litres of liquid helium are sufficient to cool down and fill the bath.
- Stop the transfer by depressurising the helium dewar via its gaz outlet valve. It should be connected to the helium recovery counter with a rubber hose.
- Once the pressure falls, take out the transfer stick.
- Once the LN2 and LHe baths are filled, check that the pressure in the vacuum vessel does not increase. Close the vacuum valve on the cryostat and the pumping rack and disconnect the pipe on the side of the cryostat.
Procedure for introducing the sample:
- If the actual regulation temperature is below 10 K, change the setpoint to 10 K.
- Connect a primary pump to the sample chamber valve (3-way blue valve) and start the pump.
- Turn the 3-way valve down (“arrow down”) to fill the sample chamber with helium gas and leave it in this position.
- Remove the flange, introduce the sample stick into the sample chamber and pump it by positioning the 3-way valve up (“arrow up”).
- Close the sample chmaber by closing the 3-ways valve (horizontal position).
- Prepare 20 cc of exchange helium gas, and introduce it via the sample valve. 20 cc of exchange gas correspond to the volume of the tail of a pressurising bladder or 20 cm of the flexible tube connected to the dewar.
