200 MPa He Pressure Regulators
Automatic 0.2 GPa Gas Pressure Controller
 (jpg - 257 Ki)
©2019 Laurent Thion <ecliptique.com>
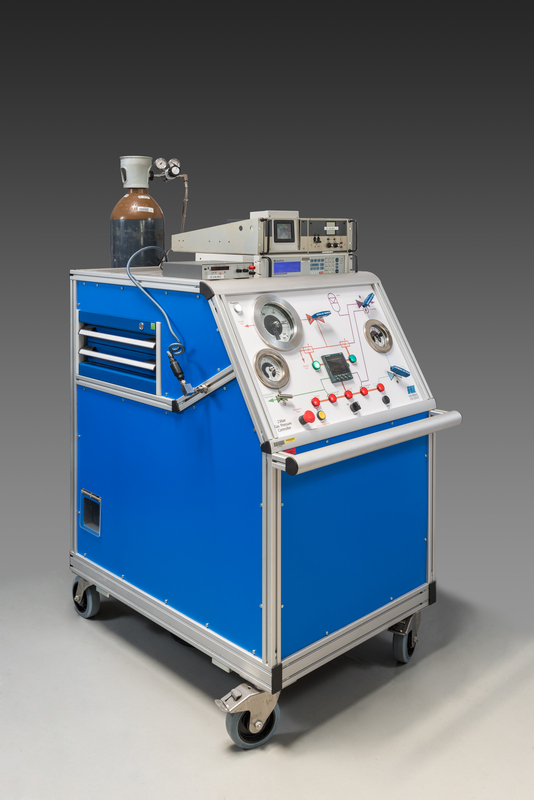
The 2kbar Gas Pressure Controller supplies continuously loaded high-pressure cells and Paris-Edinburgh presses with helium at a pressure ranging from 100 to 2 kbar (0.2 GPa). The gas is compressed with a standard single-stage diaphragm compressor from Nova-Swiss and stored in a buffer volume. The stabilization and ramps of pressure are performed with two innovative pneumatic valves patented by CNRS (patent #04 00 515). One valve is used to decrease the pressure and the other one to increase the pressure in the cell or press. They are actuated by a Eurotherm 2704 controller at a maximum rate of 30 bar per minute.
The operating principle of these novel valves is based on the elastic deformation of materials and is characterized by the absence of a stuffing box (0-ring). This is a real innovation since a flexible seal between the valve body and the needle stem is a source of many problems: leaks, pollution, and above all large friction effects requiring high force to open/close the valve and causing large hysteresis.
The compressor, valves, controller and related electronics are packed in a crate that is easily moved to the instruments. It also features two rollers of cables (380V and compressed air) and an external platform onto which a bottle of helium can safely be attached and exchanged. Remote operation is possible using the Modbus serial communication protocol (RS485 serial port or Ethernet).
Principle and safety aspects

After manually opening the helium bottle, a valve is automatically opened once the pressure delivered to the crate reaches 110 bar. A second valve is also opened when the pressure of the compressed air line reaches 6 bar. These two valves must be open to put the crate into operation. The pressures are indicated on the synoptic.
The helium gas is filtered twice and goes through a check valve. It is then compressed with a Nova-Swiss 3 kbar single-stage diaphragm compressor. A high-pressure gauge located at the exit of the compressor returns the output pressure to the Eurotherm. The gas is stored in a buffer volume whose pressure is maintained 150 bar above the setpoint requested by the user. The Eurotherm controller opens the CNRS valve (VP1) to increase the pressure in the cell or press. It opens the CNRS valve (VP2) to decrease the pressure.
If there is an overload of pressure on the sample, a power cut, a compressed air cut or no more gas in the bottle, the low and high-pressure circuits are automatically evacuated thanks to the valves operated by the mechanical pressure gauges. A 0.21 GPa relief valve located on the sample injection line and a kill switch complete the safety system.
Instruction Manual

Procedure for starting the controller
- Place the crate on a flat floor surface, as near as possible to the high-pressure cell or press.
- Unroll entirely the electric extension cord found at the back and plug it into 380V. Check that the "Plugged In" light is on.
- Unroll the compressed air pipe and plug it into the line available on the instrument. Check that the pressure is above 6 bar (required to ensure smooth operation of the crate). If necessary, open the valve on the compressed air line.
- Close the manual valves "Buffer Relief Valve", "Helium Relief Valve", "Compressed Air Relief Valve" and "Sample Cell".
- Switch on the crate by actuating the "Power" button and wait until the controller is ready.
- Open the bottle of helium located at the back of the crate and set the pressure reducer to about 50 bar.
- Check that the limits of the pressure gauges (red arrows) are set to 5.5 bar (compressed air), 100 bar (helium) and 2100 bar (sample cell). It is absolutely forbidden to change these settings.
- The pressure gauges indicate the actual pressures: about 6 bar for the compressed air line and 100 bar for the helium line.
- With the pressure reducer of the bottle of helium, set the pressure gauge of the control panel (synoptic) to 150 bar.
- Press the "Fault Acknowledgment" button twice to switch off the "Helium Fault" and "Compressor Fault" lights.
- If there is no fault, the red lights are off and the pressure controller is ready.
- If necessary, to flush the helium line, open the "Sample Cell" valve, enter a setpoint of about 2 bar on the Eurotherm and wait until helium flows out of the capillary, enter a setpoint of 0 and close the valve.
- Plug the capillary into the high-pressure cell or press, open the "Sample Cell" valve.
Procedure for using the controller
With the arrow keys of the Eurotherm controller, enter the required pressure. Once the "Sample Setpoint" is indicated on the display, the compressor starts. After a few minutes, if there is no leak, the pressure is regulated around the setpoint value. Here is the time expected to reach the required pressure:
- about 3 minutes to reach 500 bar (50 MPa)
- about 5 minutes to reach 1000 bar (100 MPa)
- about 20 minutes to precisely stabilize the pressure at 2000 bar (200 MPa)
To increase or decrease the pressure on the sample, modify the "Sample Setpoint" value using the arrow keys on the Eurotherm.
Procedure for changing the helium bottle
For exchanging the helium bottle while the controller is in operation:
- Close the helium bottle.
- Open and close the pressure reducer of the bottle to purge the gas, until 0 bar.
- Remove the pressure reducer and extract the bottle from the platform of the crate.
- Install and attach the new bottle on the platform of the crate.
- Screw the pressure reducer in by hand (without tool).
- Open the bottle and adjust the pressure regulator so that 150 bar is indicated on the control panel (synoptic).
Procedure for stopping the controller and disconnecting the cell or press
To release the pressure, enter a "Sample Setpoint" of 0.00 using the arrow keys on the Eurotherm and wait. This takes about 35 minutes when starting from 100 MPa (1000 bar) when the temperature is high enough to truly release the pressure in the cell. If the temperature is too low, you must warm up the cell in order to follow the solidification curve of He.
Once the pressure at about 0:
- Close the helium bottle.
- Open the "Buffer Relief Valve" slowly.
- Check that the pressure decreases to zero on the "Sample Cell" mechanical gauge before disconnecting the capillary.
- A loud noise may be produced when the rack is switched off (relief of the compressed air line and helium buffer).